Enable your chatbot for RESTful API access
This step is performed at denser.ai.
This step assumes that you already have a chatbot at Denser.ai. If not, please follow one of these guides to create your own chatbot.
On the main screen of your selected chatbot, make sure you selected Access Control. Then select REST API Access tab under the Access Control panel.
If REST API access has been enabled and you know the API key, you can use that existing API key for Zapier integration. Otherwise, click Generate API Key button to generate a new API key.

Prepare Google worksheet
This step is performed on your Google Sheets account.
This step is required for configuring Denser chatbot as Zap trigger Create a Google worksheet in your Google Sheets account. Choose a name for your worksheet that you can easily recognize when you need to select worksheet later. Make sure you named the columns in the first row as shown in the following screenshot.

Denser chatbot as trigger
This step is performed at zapier.com.
A zap is an automated workflow that integrates multiple Zapier apps. A zap consists of a trigger and one or more actions. Denser chatbot can be configured as either a trigger or an action. This section demostrates how to configure Denser chatbot as a trigger. The example zap used in this section is a workflow of 2 steps: 1) send a question to your chatbot; and 2) the outputs are recorded in Google Sheets.

To create the example workflow, you need to create a new zap, which container a trigger and an action.

Configure your chatbot as trigger
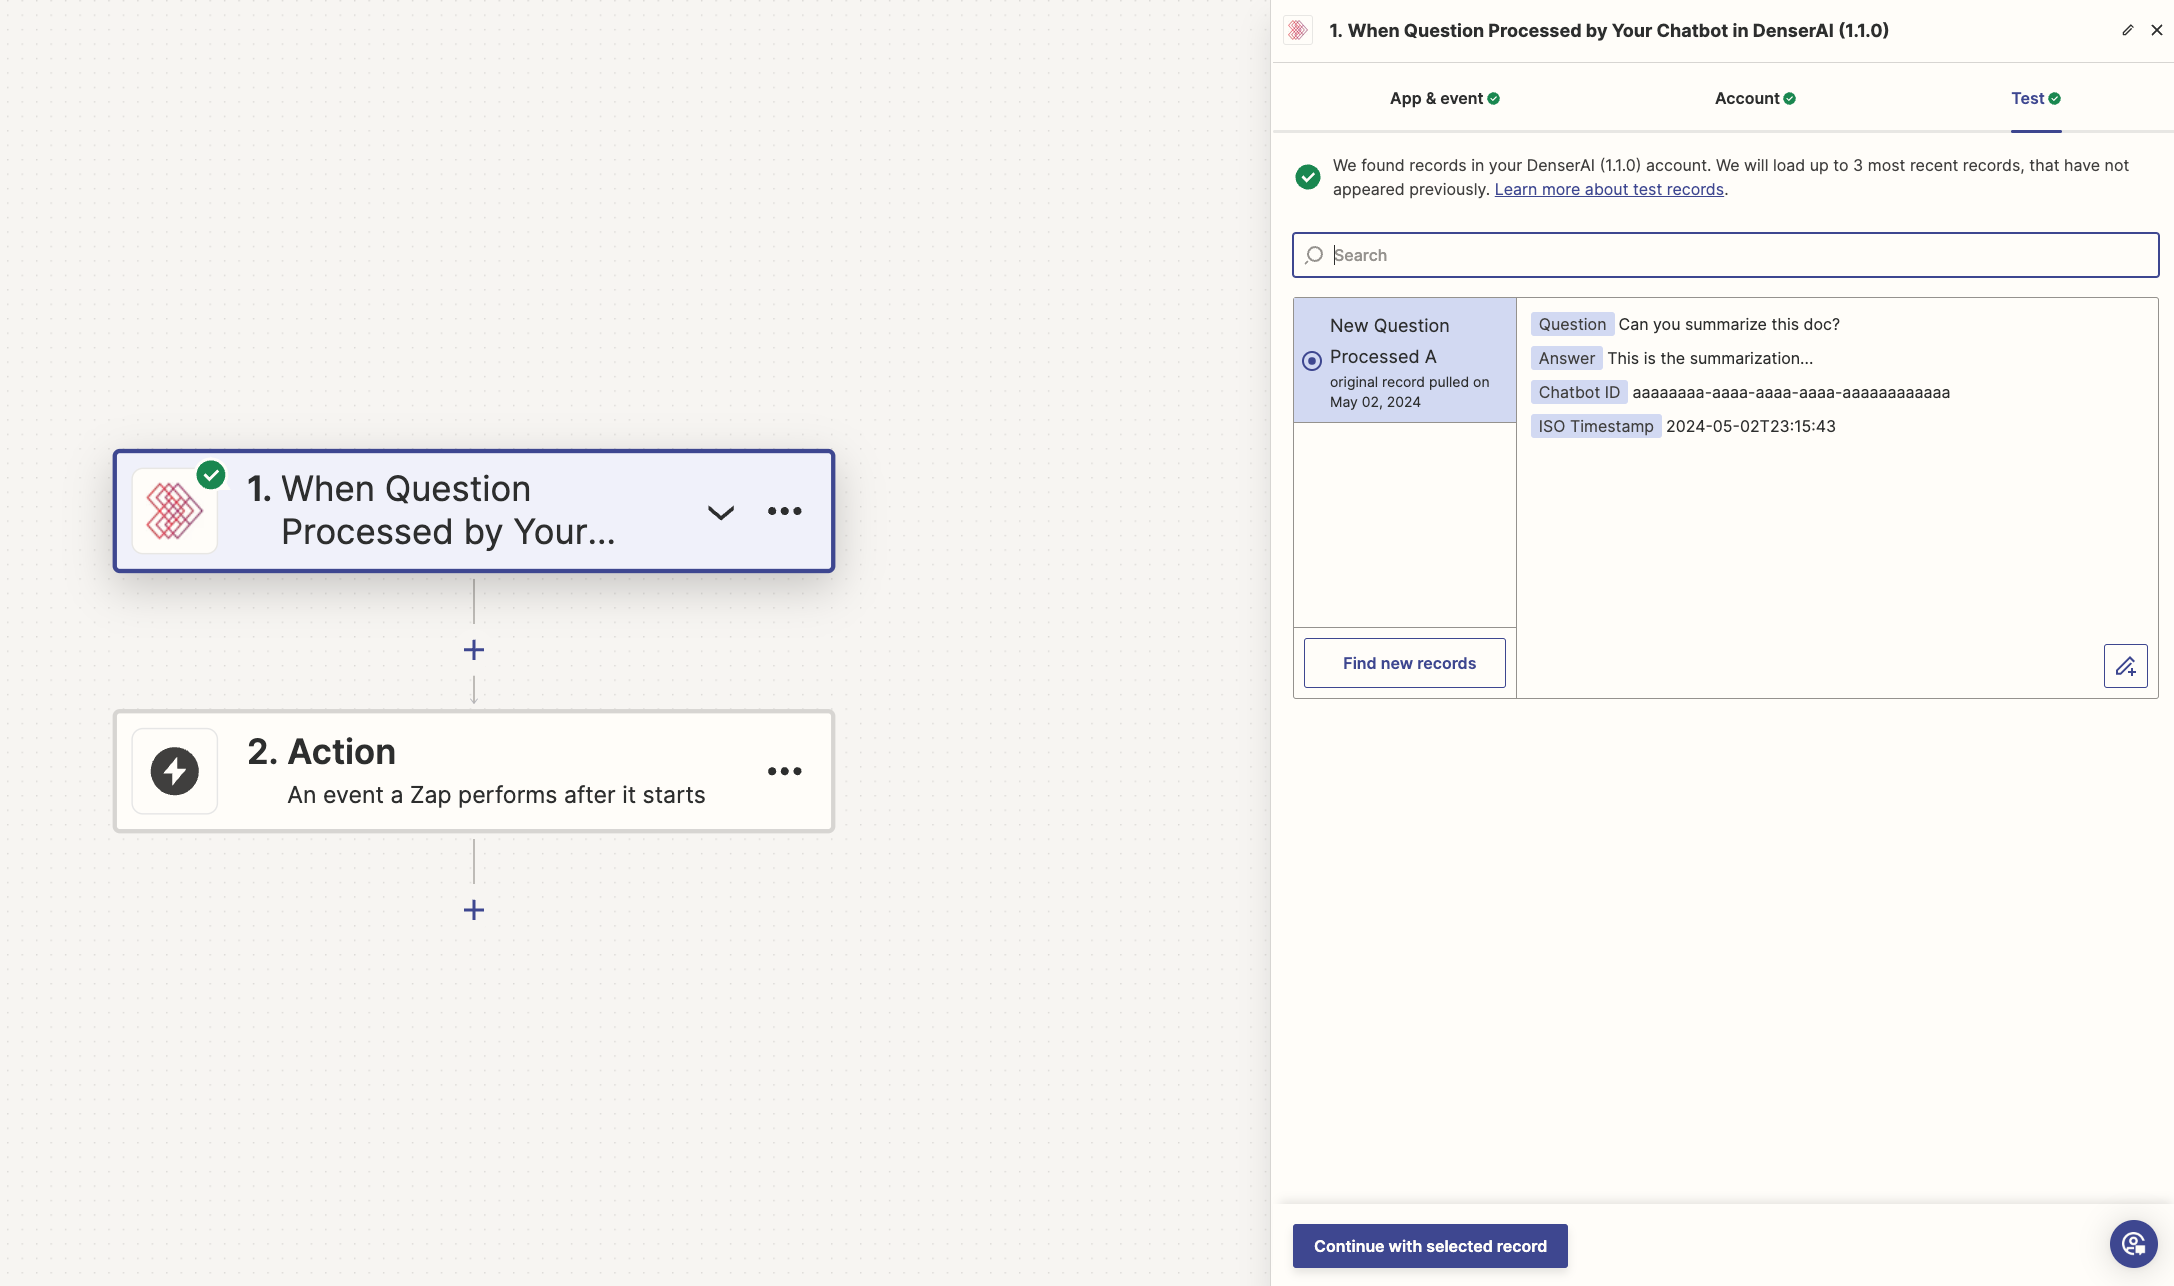
First, click Trigger step, search for DenserAI on the popup window and select it as trigger. Perform the following to complete DenserAI trigger configuration:
- At App & event tab, select event When Question Process by Your Chatbot.
- At Account tab, provide your chatbot ID and the REST Access Key. You can find chatbot ID from chatbot screen at denser.ai. REST Access API key is the key you generated from previous step Enable your chatbot for RESTful API access.
- At Test tab, an example output should be returned for testing and click Continue with selected Record button.
Configure Google Sheets as action
Search for Google Sheets and select it as action.
- At App & event tab, select event Create Spreadsheet Row.
- At Account tab, grant Zapier access to your Google account by authenticate to your Google account.
- At Action tab, fill the fields with the Google worksheet that you prepared at previous step. After you filled fields, make sure you pressed Refresh button. After refresh, Action tab displays 4 more fields that match the columns you created in the worksheet. You can click each field and select the corresponding output field from chatbot trigger. Please refer to the screenshot below for details.
- At Test tab, click Test step button and then verify the example chatbot output is added into your Google worksheet.

Finally, you can publish this zap workflow. Each time you sent a question to your chatbot on denser.ai webapp, you should see the chat information added as a new row in Google Sheets after a short delay.
Denser chatbot as action
This step is performed at zapier.com.
The following example zap is a workflow of 3 steps: 1) user asks a question in a specific Slack channel; 2) DenserAI chatbot answers the question; and finally; 3) the answer is posted back to the same Slack channel. To create the example zap workflow, you need to start with creating a new zap as in the last section.

Configure Slack as trigger
First, you need to configure a trigger that sends a text message to your chatbot. Click Trigger step, search for Slack on the popup window and select Slack.

A few clicks are required to complete the Slack trigger configuration:
- At App & event tab, select event New Message Posted to Channel.
- At Account tab, grant Zapier access to your Slack account by authenticate to your Slack account.
- At Trigger tab, select a Slack channel to trigger message.
The following screenshot shows how Slack trigger should look like after successful configuration.

Configure DenserAI chatbot as action
In this example zap, your DenserAI chatbot is configured as the action to process input message from the Slack channel you selected at the last step Configure Slack as Trigger. Click Action step, search for DenserAI on the popup window and select DenserAI.
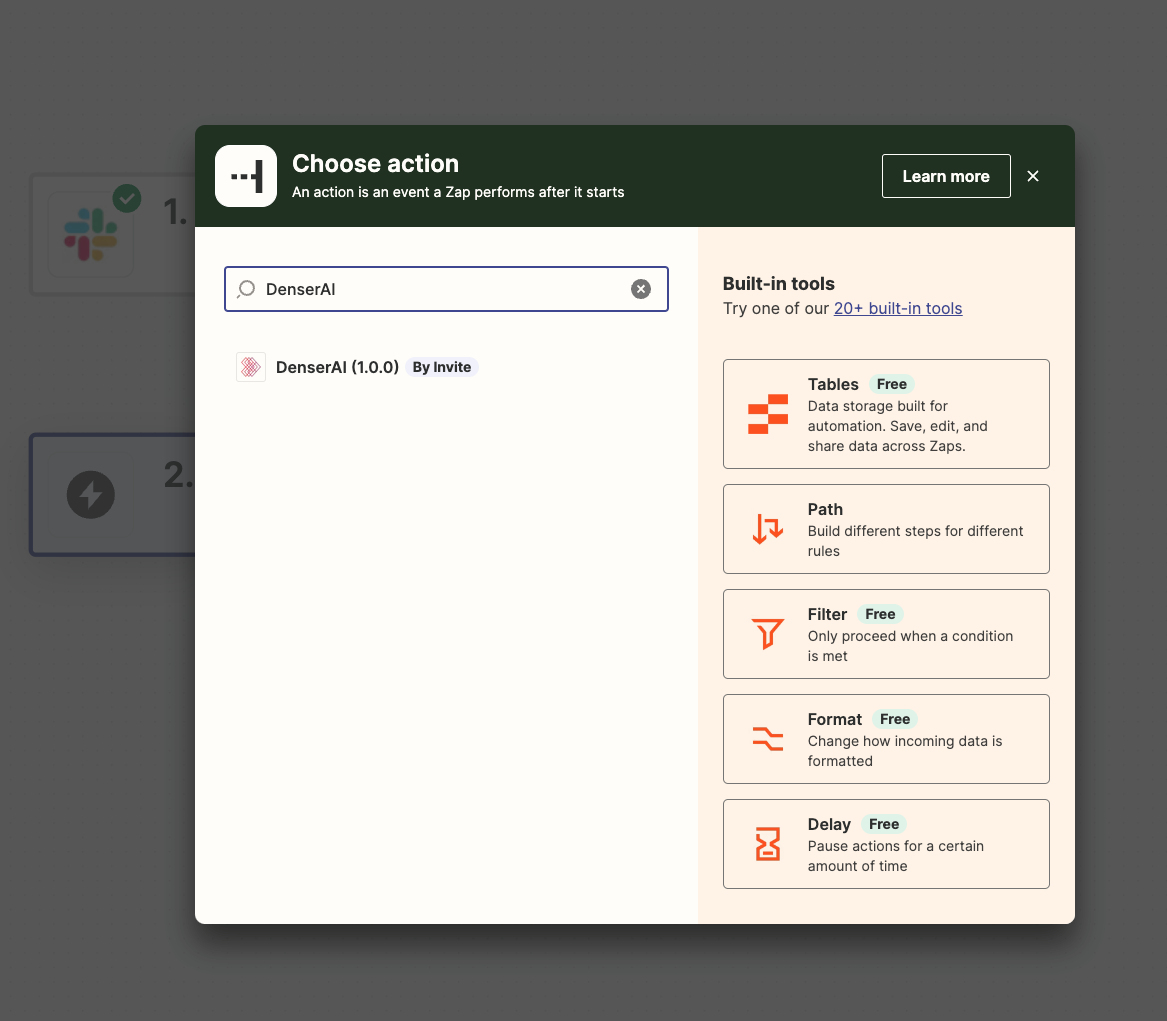
Perform the following steps to complete DenserAI action configuration:
- At App & event tab, select event Process Input Text.
- At Account tab, provide your chatbot ID and the REST Access Key. You can find chatbot ID from chatbot screen at denser.ai. REST Access API key is the key you generated from previous step Enable your chatbot for RESTful API access.
- At Action tab, select Text property of Slack message for Question field.

A successfully completed DenserAI chatbot configruation should look similar to the one in the following screenshot.

Configure Slack as output action
After your chatbot processed message from Slack, the answer from the chatbot can be wired to another Zapier action (e.g. to perform notification or to store the answer). In this example zap, the output is sent to the same Slack channel as a new message.
Click + icon below DenserAI step to add another Zapier step. Select Slack as the app for this step, similarly to previous step Configure Slack as Trigger.
Perform the following steps to complete Slack output action configuration:
- At App & event tab, select event Send Channel Message.
- At Account tab, no action should be required since you should have granted Zapier access to your Slack account.
- At Action tab, select a Slack channel for output message, you can simply use the same channel as in step Configure Slack as Trigger. Set Message Text field to be property Answer from DenserAI step. Set Send as a bot? to "Yes". You can keep the rest input to default.
Finally, you can publish this zap workflow and start enjoying usage of DenserAI chatbot integration with Zapier apps!
Configure Denser.ai Lead Generation with Zapier Workflow
This guide shows Denser.ai chat that can be configured as a Zapier trigger. We also support triggering Zapier workflow when a lead generation form is submitted in Denser chat window. Please see Integrate Denser.ai Lead Generation with Zapier Workflow.
Embed Zapier within Denser.ai
This step is performed at denser.ai.
On the screen of your selected chatbot, make sure you selected Integration. Then select tile with title Integrate with Zapier Workflow.
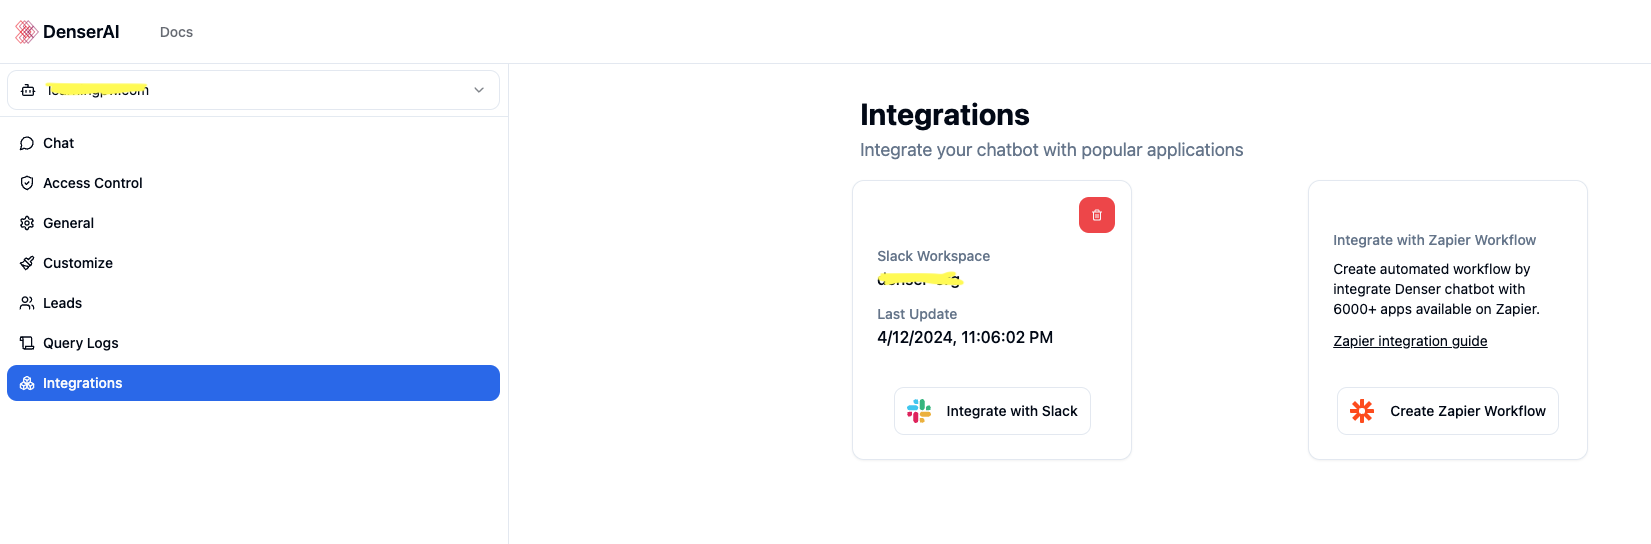
Click Create Zapier Workflow button to open Zapier editor in a popup window. The Zapier editor embedded in Denser.ai should be the same as the one you opened on Zapier website. The zap creation guide in the last section Create worklow at Zapier can be applied.
The popup window displays the current chatbot selected for Zapier integration for convenience. User can simply copy and paste the chatbot Id at the step of configuring Denser chatbot account. See Configure DenserAI chatbot as action.
